 จากครั้งที่แล้วได้เริ่มการทดลองสร้างโปรเจ็คของ android กันไปแล้ว แต่ก็ยังไม่ได้ลงมือเขียน code สักบรรทัด เพราะยังไม่รู้ว่าจะเอาอะไรมาเป็นตัวอย่างดี วันนี้คิดออกหละ เรามาต่อที่เรื่องง่ายๆกันก่อน โดยเริ่มจากการสร้าง web browser นี้หละง่ายดี ใช้ control ไม่กี่ตัวก็สร้างได้แล้ว อย่างน้อยที่สุดเราก็จะได้รู้วิธีการเรียกใช้ Event onClick เป็นอย่างน้อย ^^
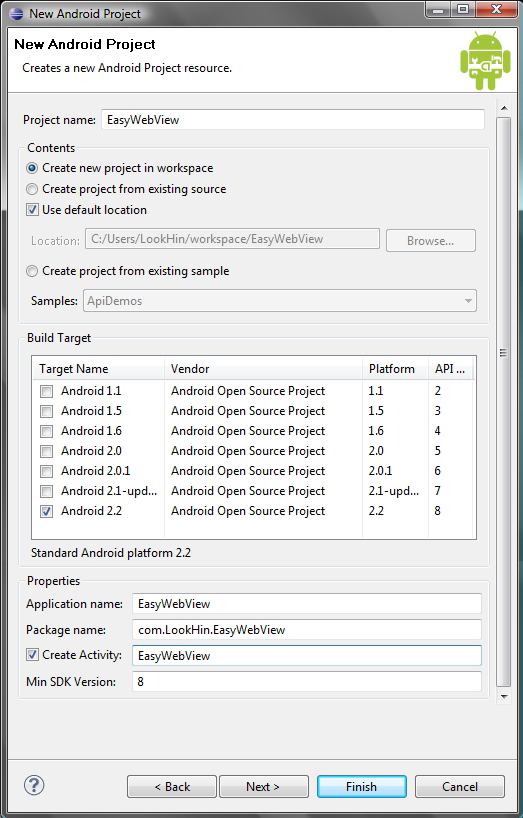
อย่างแรกสร้างโปรเจ็คขึ้นมาใหม่ก่อน ตั้งชื่อว่า “EasyWebView” หากจำวิธีสร้างไม่ได้ให้กลับไปดูบทความที่แล้วกันก่อน https://www.unzeen.com/article/927/index.html จากนั้นก็ follow ตามนี้เลย
สร้างโปรเจ็คชื่อ EasyWebView
เมื่อสร้างโปรเจ็คเสร็จแล้วก็เข้าไปที่ AndroidManifest.xml และทำการเพิ่ม <uses-permission android:name="android.permission.INTERNET" /> โดยเพิ่มเข้าไปใน node <manifest> เพื่อให้โปรแกรมของเราสามารถใช้งาน Internet ได้
เพิ่ม <uses-permission android:name="android.permission.INTERNET" /> เข้าไปตรงนี้
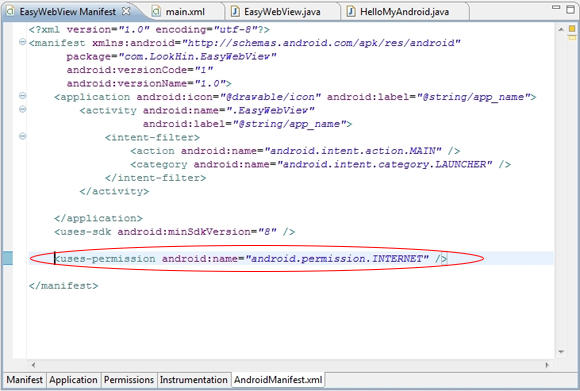
# และแล้วหน้าตา AndroidManifest.xml ของเราก็จะออกมาแบบนี้
1 2 3 4 5 6 7 8 9 10 11 12 13 14 15 16 17 18 19 20 | <?xml version="1.0" encoding="utf-8"?> <manifest xmlns:android="http://schemas.android.com/apk/res/android" package="com.LookHin.EasyWebView" android:versionCode="1" android:versionName="1.0"> <application android:icon="@drawable/icon" android:label="@string/app_name"> <activity android:name=".EasyWebView" android:label="@string/app_name"> <intent-filter> <action android:name="android.intent.action.MAIN" /> <category android:name="android.intent.category.LAUNCHER" /> </intent-filter> </activity> </application> <uses-sdk android:minSdkVersion="8" /> <uses-permission android:name="android.permission.INTERNET" /> </manifest> |
จากนั้นเข้าไปที่ res -> layout -> main.xml เลือกหน้าจอเป็น 3.7in WVGA (Nexus One) และกำหนดเป็น Portrait เพื่อให้จออยู่ในแนวตั้ง จากนั้นคลิกขวาที่ Object TextView แล้วเลือก Remove
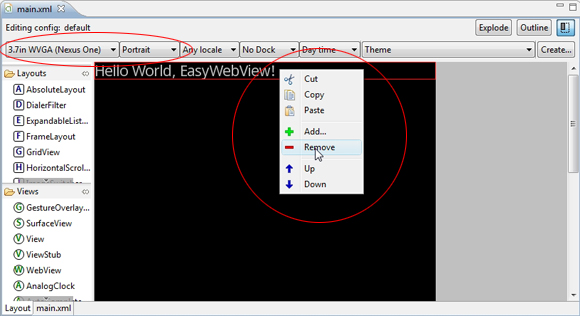
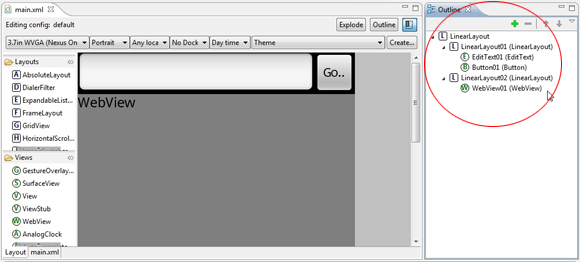
เราก็จะได้ Layout ว่างๆเหมือนในรูป ต่อไปให้ทำการเพิ่ม Object ต่างๆดังนี้ LinearLayout , EditText , Button , WebView โดยให้คลิกที่เครื่องหมายบวก (+) ในช่อง Outline หรือจะลากจาก Layouts และ Views ที่อยู่ทางซ้ายมือมาใส่ในหน้าจอก็ได้ แต่ผมลองหลายทีแล้วก็ยังไม่รู้สึกสะดวกเท่ากับการคลิก + ในช่อง Outline ซักที
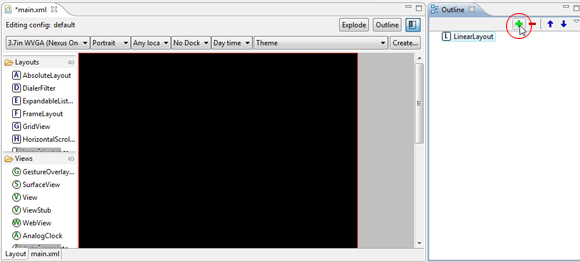
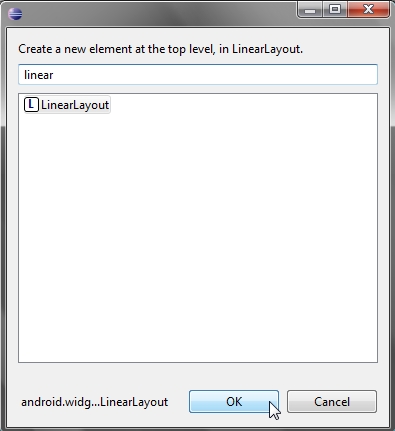
เมื่อคลิกเครื่องหมายบวก (+) ในช่อง Outline ก็จะได้หน้าจอมาให้เลือกว่าเราจะเอาอะไรใส่ลงไป เริ่มจากใส่ LinearLayout ลงไปก่อน แล้วก็ตามด้วย EditText , Button , WebView
จะได้ Object ต่างๆที่เราใส่ลงไปเหมือนในรูป (หน้าจอที่ preview ออกมาอาจจะยังไม่เหมือนในรูป ให้เราไปกำหนด properties ของ object แต่ละตัวก่อนนะ)
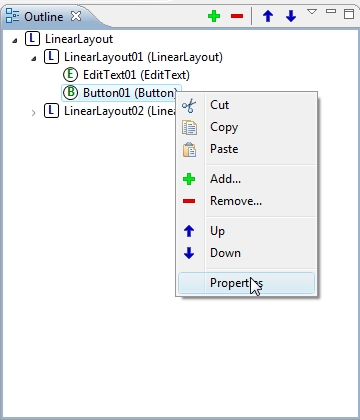
จากนั้นทำการคลิกขวาที่ Object แต่ละตัวแล้วเลือก Properties
ทำการกำหนด Properties ให้แต่ละ Object ตามนี้
1 2 3 4 5 6 7 8 9 10 11 12 13 14 15 16 17 18 19 20 21 22 23 24 | # LinearLayout01 - Layout height : wrap_content - Layout width : fill_parent # EditText01 - Layout height : wrap_content - Layout width : fill_parent // กำหนดให้ object นี้ขยายความกว้างเต็มจอ - Layout weight : 1 // ใส่เป็น 1 จะได้มีพื้นที่เหลือให้ object อื่นด้วย (ถ้าไม่ใส่ Layout weight เป็น 1 ออบเจ็ค Button01 ที่อยู่ถัดไปจะหายไปจากหน้าจอเลยนะ) # Button01 - Layout width : wrap_content - Layout height : wrap_content - text : "Go.." - onClick : goWebsiteNow // เรียกใช้ Method goWebsiteNow # LinearLayout02 - Layout height : wrap_content - Layout width : fill_paren - Layout weight : 1 # WebView01 - Layout width : fill_parent - Layout height : fill_parent |
ตัวอย่าง Properties On Click ของ Button01
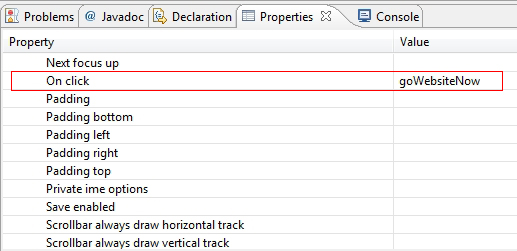
# ถ้าทำแล้วยังไม่เหมือนก็ copy layout main.xml ไปใช้ก่อนเลย
1 2 3 4 5 6 7 8 9 10 11 12 13 14 15 16 17 18 19 20 21 22 23 24 25 26 27 28 29 30 31 32 33 34 35 36 37 38 39 40 41 | <?xml version="1.0" encoding="utf-8"?> <LinearLayout xmlns:android="http://schemas.android.com/apk/res/android" android:orientation="vertical" android:layout_width="fill_parent" android:layout_height="fill_parent"> <LinearLayout android:id="@+id/LinearLayout01" android:layout_height="wrap_content" android:layout_width="fill_parent"> <EditText android:id="@+id/EditText01" android:layout_height="wrap_content" android:layout_width="fill_parent" android:layout_weight="1"> </EditText> <Button android:id="@+id/Button01" android:layout_width="wrap_content" android:layout_height="wrap_content" android:text="Go.." android:onClick="goWebsiteNow"> </Button> </LinearLayout> <LinearLayout android:id="@+id/LinearLayout02" android:layout_height="wrap_content" android:layout_width="fill_parent" android:layout_weight="1"> <WebView android:id="@+id/WebView01" android:layout_width="fill_parent" android:layout_height="fill_parent"> </WebView> </LinearLayout> </LinearLayout> |
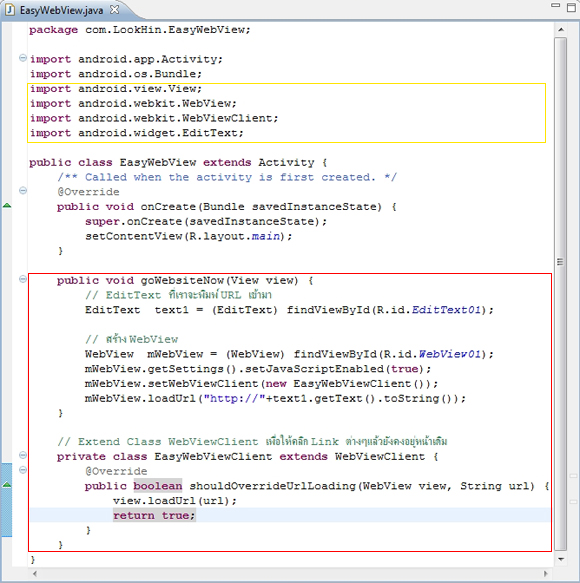
จากนั้นทำการเพิ่ม Method goWebsiteNow ลงใน EasyWebView.java
1 2 3 4 5 6 7 8 9 10 11 12 13 14 15 16 17 18 19 | public void goWebsiteNow(View view) { // EditText ที่เราจะพิมพ์ URL เข้ามา EditText text1 = (EditText) findViewById(R.id.EditText01); // สร้าง WebView WebView mWebView = (WebView) findViewById(R.id.WebView01); mWebView.getSettings().setJavaScriptEnabled(true); mWebView.setWebViewClient(new EasyWebViewClient()); mWebView.loadUrl("http://"+text1.getText().toString()); } // Extend Class WebViewClient เพื่อให้คลิก Link ต่างๆแล้วยังคงอยู่หน้าเดิม private class EasyWebViewClient extends WebViewClient { @Override public boolean shouldOverrideUrlLoading(WebView view, String url) { view.loadUrl(url); return true; } } |
เมื่อเพิ่ม code ลงไปแล้วให้กด CTRL + SHIFT + O ตัว Eclipse ก็จะทำการ import package ต่างๆที่ต้องใช้มาให้เราอย่างไม่น่าเชื่อ
จากนั้นก็ Run เพื่อทดสอบโปรแกรมได้แล้วจ้า ^^
